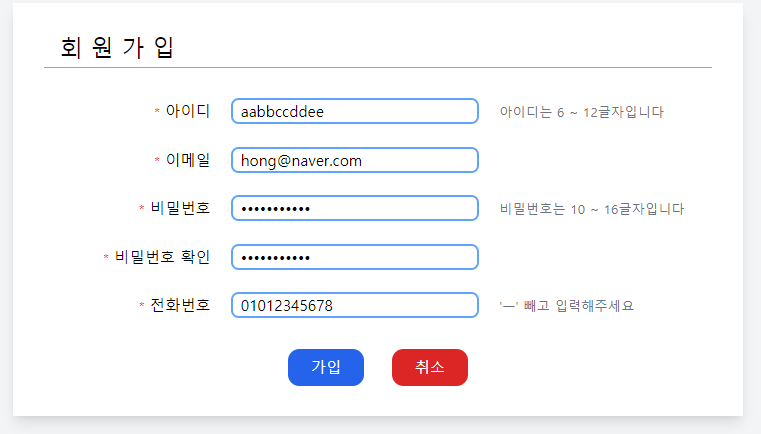
라라벨 회원가입 기능을 만들어보겠습니다.
https://jetstream.laravel.com/1.x/installation.html
Installation | Laravel Jetstream
Installation Installing Jetstream You may use Composer to install Jetstream into your new Laravel project: After installing the Jetstream package, you should run the jetstream:install Artisan command. This command accepts the name of the stack you prefer (
jetstream.laravel.com
위 기능을 사용하면 편하게 로그인, 회원가입 기능을 만들 수 있지만
직접 만들어보겠습니다.
코드 중 css 관련해서는 tailwindcss를 사용했습니다.
먼저 회원가입 양식을 만들어봅시다.
register.blade.php를 만드는데 경로는 resources --> views --> register.blade.php 입니다.
@extends('layouts.main')
@section('title', '회원가입')
@section('content')
<div class="mx-auto p-8 max-w-3xl h-auto bg-white shadow-lg">
<form method="POST" action="register">
@csrf
<p class="border-b border-gray-400 text-left mb-8 pb-1 text-2xl">  회 원 가 입</p>
<p>
<label for="userId" class="inline-block w-1/4 text-right mr-4">
<span class="text-sm text-red-500">*</span>
아이디</label>
<input id="userId" type="text" name="userId" class="{{$errors-> first('userId') ? 'border-2 border-red-600' : 'border-2 border-blue-400'}} rounded-lg pl-2
" size="30" value="{{old('userId') ? old('userId') : ' '}}">
<span class="ml-4 text-sm text-gray-500">아이디는 6 ~ 12글자입니다</span>
</p>
<p class="mt-6">
<label for="email" class="inline-block w-1/4 text-right mr-4">
<span class="text-sm text-red-500">*</span>
이메일</label>
<input id="email" type="email" name="email" class="{{$errors-> first('email') ? 'border-2 border-red-600' : 'border-2 border-blue-400'}} rounded-lg pl-2"
size="30" value="{{old('email') ? old('email') : ' '}}">
</p>
<p class="mt-6">
<label for="password" class="inline-block w-1/4 text-right mr-4">
<span class="text-sm text-red-500">*</span>
비밀번호</label>
<input id="password" type="password" name="password" class="{{$errors-> first('password') ? 'border-2 border-red-600' : 'border-2 border-blue-400'}} rounded-lg pl-2"
size="30">
<span class="ml-4 text-sm text-gray-500">비밀번호는 10 ~ 16글자입니다</span>
</p>
<p class="mt-6">
<label for="password_confirmation" class="inline-block w-1/4 text-right mr-4">
<span class="text-sm text-red-500">*</span>
비밀번호 확인</label>
<input id="password_confirmation" type="password" name="password_confirmation"
class="{{$errors-> first('password_confirmation') ? 'border-2 border-red-600' : 'border-2 border-blue-400'}} rounded-lg pl-2" size="30">
</p>
<p class="mt-6">
<label for="tel" class="inline-block w-1/4 text-right mr-4">
<span class="text-sm text-red-500">*</span>
전화번호</label>
<input id="tel" type="tel" name="tel" class="{{$errors-> first('tel') ? 'border-2 border-red-600' : 'border-2 border-blue-400'}} rounded-lg pl-2"
size="30" value="{{old('tel') ? old('tel') : ' '}}">
<span class="ml-4 text-sm text-gray-500">'ㅡ' 빼고 입력해주세요</span>
</p>
<p class="mt-8 text-center">
<input class="bg-blue-600 rounded-xl hover:bg-blue-800 text-white px-6 py-2 mr-6" type="submit" value="가입">
<input class="bg-red-600 rounded-xl hover:bg-red-800 text-white px-6 py-2" id="backMain" type="button"
value="취소" onclick="location.href = '{{route('main')}}'">
</p>
</form>
</div>
@endsection

라우트를 설정해야해서 아직 화면이 안나올겁니다.
위 코드에서 주의하실 점은 비밀번호, 비밀번호 확인의 input name을
각각 password, password_confirmation으로 해줘야합니다.
이유는 비밀번호 유효성 검사에서 사용할 confrimed 때문에 그렇습니다.

블레이드 문법 {{$errors -> .........}} 이 부분은 유효성 검사를 했을 때
실패하면 다시 회원가입 페이지로 돌아오는데, 그 때 input 박스의 테두리를 빨갛게 변경시켜줍니다.
value 부분에 있는 {{old('tel') ? old('tel') : ' '}} 이런 양식들은 유효성 검사에 실패했을 때
이전에 작성한 것이 있으면 보여주고, 없으면 공백을 나타내는 부분입니다.
다음으로 컨트롤러를 만들어줍니다.
app --> Http --> RegisterController.php 이 경로에 만들어줍시다.
<?php

namespace App\Http\Controllers;

use Illuminate\Http\Request;
use Illuminate\Support\Facades\DB;
use Illuminate\Support\Facades\Hash;
use App\Models\User;

class RegisterController extends Controller
{

    public function index()
    {
        return view('register');
    }


    public function store(Request $request)
    {
        $validation = $request -> validate([
            'userId' => 'required|min:6|max:12|unique:users|string',
            'password' => 'required|min:10|max:16|confirmed',
            'email' => 'required|email',
            'tel' => 'required|min:11|max:11'
        ]);

        User::create([
            'userId' => $validation['userId'],
            'password' => Hash::make($validation['password']),
            'email' => $validation['email'],
            'tel' => $validation['tel']
        ]);

        return redirect('/');

    }

}
index는 회원가입 화면이고
store가 회원가입 정보를 저장하는 부분입니다.
$validation 부분이 유효성 검사를 한다고 생각하시면 됩니다.
배열안의 원소들은 input name => '유효성 검사' 이 양식으로 생각하시면 됩니다.
password 부분에 confirmed가 위에서 언급한 것입니다.
다른 유효성 검사 방법들은 아래 링크에서 확인 가능합니다.
https://laravel.kr/docs/8.x/validation#confirmed
라라벨 8.x - Validation-유효성검사
라라벨 한글 메뉴얼 8.x - Validation-유효성검사
laravel.kr
다음으로 User 모델을 사용해 데이터베이스에 회원가입 정보들을 넣어줍니다.
password 부분에서 Hash는 비밀번호를 해싱해서 저장하게 해줍니다.
성공했을 시, 메인 화면으로 가게했습니다.
User 모델은 이미 만들어져있기 때문있습니다.
app --> Models --> User.php를 열어줍시다.
<?php

namespace App\Models;

use Illuminate\Contracts\Auth\MustVerifyEmail;
use Illuminate\Database\Eloquent\Factories\HasFactory;
use Illuminate\Foundation\Auth\User as Authenticatable;
use Illuminate\Notifications\Notifiable;

class User extends Authenticatable
{
    use HasFactory, Notifiable;


    /**
     * The attributes that are mass assignable.
     *
     * @var array
     */
    protected $fillable = [
        'userId',
        'email',
        'password',
        'tel',

    ];

    /**
     * The attributes that should be hidden for arrays.
     *
     * @var array
     */
    protected $hidden = [
        'password',
        'remember_token',
    ];

    /**
     * The attributes that should be cast to native types.
     *
     * @var array
     */
    protected $casts = [
        'email_verified_at' => 'datetime',
    ];
}
그리고 위와 같이 $fillable 부분을 바꿔줍시다.
라우트를 깜빡했네요..
routes --> web.php를 열어서 아래와 같이 작성해줍시다.
라우트 부분을 설정하지 않으면 화면이 나오지 않습니다.
<?php

use Illuminate\Support\Facades\Route;
use App\Http\Controllers\RegisterController;

/*
|--------------------------------------------------------------------------
| Web Routes
|--------------------------------------------------------------------------
|
| Here is where you can register web routes for your application. These
| routes are loaded by the RouteServiceProvider within a group which
| contains the "web" middleware group. Now create something great!
|
*/

Route::get('/', function () {
    return view('index');
}) -> name('main');

Route::get('register', [RegisterController::class, 'index']) -> name('register');
Route::POST('register', [RegisterController::class, 'store']);
DB 부분입니다. (DB연동은 따로 설명하지 않겠습니다.)
database --> migrations에 있는 create_users_table.php를 열고
<?php

use Illuminate\Database\Migrations\Migration;
use Illuminate\Database\Schema\Blueprint;
use Illuminate\Support\Facades\Schema;

class CreateUsersTable extends Migration
{
    /**
     * Run the migrations.
     *
     * @return void
     */
    public function up()
    {
        Schema::create('users', function (Blueprint $table) {
            $table->id();
            $table->string('userId');
            $table->string('email');
            $table->string('password');
            $table->string('tel');
            $table->rememberToken();
            $table->timestamps();
        });
    }

    /**
     * Reverse the migrations.
     *
     * @return void
     */
    public function down()
    {
        Schema::dropIfExists('users');
    }
}
위와 같이 입력하고 터미널에 php artisan migrate를 입력해 마이그레이션 해줍시다.
회원가입 창으로 가서 회원가입을 해봅시다.


제대로 저장된 것을 확인할 수 있습니다.
로그인은 다음 글에 이어서 하겠습니다.
'IT > PHP' 카테고리의 다른 글
| Laravel - 구글 소셜 로그인(1) (0) | 2020.12.13 |
|---|---|
| Laravel - 로그인 (0) | 2020.12.10 |
| Laravel - 댓글 작성하기 (0) | 2020.07.26 |
| PHP/Laravel(11) CRUD#4 (0) | 2020.02.23 |
| PHP/Laravel(10) CRUD#3 (0) | 2020.02.23 |


댓글